 Oh-My-Note
如何用 Cloud Run 和 docker 部署应用
技术栈
- Google Cloud Run—— 部署线上 node 应用
- docker——容器化
- next.js——前端 SSR
- GitHub Action——CI/CD
- Turbo-repo——monorepo
- S3——存储静态资源
- Cloud front —— CDN 服务器缓存静态资源
- Artifact Registry—— Image 存储仓库
初始化 Turbo-repo 项目
shell1cd Desktop/
2pnpm dlx create-turbo@latest // 使用 turbo 命令创建 turbo 项目
3Progress: resolved 96, reused 91, downloaded 5, added 96, done
4? Where would you like to create your Turborepo? deploy-to-gcr-example
5? Which package manager do you want to use? pnpm
创建完项目后,进入项目,并删除默认的 app
shell1cd deploy-to-gcr-example/
2rm -rf apps/docs
3rm -rf apps/web
在 apps 目录下自己起一个 nextjs 的新项目。
shell1cd apps/
2npx create-next-app@latest
3
4Need to install the following packages:
5  create-next-app@14.2.13
6Ok to proceed? (y) y
7✔ What is your project named? … web
8✔ Would you like to use TypeScript? … No / Yes
9✔ Would you like to use ESLint? … No / Yes
10✔ Would you like to use Tailwind CSS? … No / Yes
11✔ Would you like to use `src/` directory? … No / Yes
12✔ Would you like to use App Router? (recommended) … No / Yes
13✔ Would you like to customize the default import alias (@/*)? … No / Yes
14✔ What import alias would you like configured? … @/*
在新建的名为 web 的 next.js 项目中增加一个.env.beta环境变量文件,并添加环境变量:
shell1NEXT_PUBLIC_APP_ENV=beta
新建一个.env文件,并添加环境变量:
shell1NEXT_PUBLIC_APP_ENV=local
在 web 项目中安装 dotenv
shell1pnpm -F web install dotenv
修改 next.config.js 文件
js1/* eslint-disable @typescript-eslint/no-require-imports */
2/** @type {import('next').NextConfig} */
3
4const path = require('node:path')
5const dotenv = require('dotenv')
6
7const envFile = process.env.APP_ENV ? `.env.${process.env.APP_ENV}` : '.env'
8
9module.exports = {
10  transpilePackages: ['@repo/ui'],
11  output: 'standalone', // 将输出文件打包成 standalone 模式
12  experimental: {
13    outputFileTracingRoot: path.join(__dirname, '../../'),
14  },
15  env: {
16    ...dotenv.config({ path: envFile }).parsed,
17  },
18}
在 package.json 中增加一个 script
json1"build:beta": "APP_ENV=beta pnpm run build"
修改 page.tsx 文件的内容为
tsx1export default function Home() {
2  return (
3    <main className="flex min-h-screen flex-col items-center justify-between p-24">
4      NEXT_PUBLIC_APP_ENV:{JSON.stringify(process.env.NEXT_PUBLIC_APP_ENV)}
5    </main>
6  )
7}
为什么我们需要设置 APP_ENV 环境变量?
在真实项目中,我们可能会把前端项目分为:本地开发环境、dev 环境、test 环境和 production 环境,而 nextjs 默认的环境变量仅支持在执行
pnpm dev,pnpm start时,将NODE_ENV设置成development和production。因此,我们在部署不同环境的应用时,需要一个用来表示部署环境的变量
APP_ENV,将其通过命令"build:beta": "APP_ENV=beta pnpm run build",将APP_ENV环境变量注入到 nextjs 中,最终通过next.config.js来达到读取正确的环境变量的目的。
尝试启动项目
shell1pnpm dev
当项目正确启动后,你应该可以在 localhost:3000 中看到此时的页面仅有一个环境变量的文字:
html
此时提交一次代码
shell1 git add .
2 git commit -m 'initial web app'
容器化 web 项目
如果要将 nodejs 应用容器化,首先需要将其做成 docker image,我们先创建一个 Dockerfile 文件
shell1touch apps/web/Dockerfile
并写入内容
dockerfile1ARG NODE_VERSION=18.17.0 2 3################################################################################ 4# Use node image for base image for all stages. 5FROM node:${NODE_VERSION}-alpine as base 6 7ARG FOLDER_NAME=web 8 9ARG PNPM_VERSION=9.4.0 10 11ARG TURBO_VERSION=2.0.4 12 13ARG BUILD_ENV 14# Set PNPM_HOME to /pnpm 15ENV PNPM_HOME="/pnpm" 16 17ENV PATH="$PNPM_HOME:$PATH" 18 19FROM base AS builder 20RUN apk add --no-cache libc6-compat 21RUN apk update 22 23# Set working directory for all build stages. 24WORKDIR /app 25 26# Install pnpm. 27RUN \ 28 npm install -g pnpm@${PNPM_VERSION} 29 30# Install turbo. 31RUN pnpm install -g turbo@${TURBO_VERSION} 32COPY . . 33 34# Generate a partial monorepo with a pruned lockfile for a target workspace. 35RUN turbo prune ${FOLDER_NAME} --docker 36 37FROM base as installer 38RUN apk add --no-cache libc6-compat 39RUN apk update 40WORKDIR /app 41 42COPY .gitignore .gitignore 43COPY /app/out/json/ . 44COPY /app/out/pnpm-lock.yaml ./pnpm-lock.yaml 45RUN \ 46 npm install -g pnpm@${PNPM_VERSION} 47 48RUN pnpm install 49 50COPY /app/out/full/ . 51 52RUN pnpm turbo run build:${BUILD_ENV} --filter=${FOLDER_NAME}... 53 54################################################################################ 55# Create a stage for building the application. 56FROM base AS runner 57WORKDIR /app 58 59# Don't run production as root 60RUN addgroup --system --gid 1001 nodejs 61RUN adduser --system --uid 1001 nextjs 62USER nextjs 63 64COPY /app/apps/${FOLDER_NAME}/next.config.js . 65COPY /app/apps/${FOLDER_NAME}/package.json . 66 67# Automatically leverage output traces to reduce image size 68# https://nextjs.org/docs/advanced-features/output-file-tracing 69COPY /app/apps/${FOLDER_NAME}/.next/standalone ./ 70COPY /app/apps/${FOLDER_NAME}/.next/static ./apps/${FOLDER_NAME}/.next/static 71COPY /app/apps/${FOLDER_NAME}/public ./apps/${FOLDER_NAME}/public 72 73EXPOSE 3000 74CMD node apps/web/server.js
在根目录的 package.json 中写入 script 命令:
shell1"build:docker:web:beta": "docker build -f apps/web/Dockerfile . -t wat-web --build-arg BUILD_ENV=beta",
命令解释:
docker build使用 docker 将应用打包成 image
-f apps/web/Dockerfile指定 Dockerfile 文件
.点号表示构建上下文的路径。构建上下文是 Docker 在构建镜像时能够访问的文件和目录。在这个例子中,点号表示当前目录是构建上下文。
-t wat-web这个选项用于标记(tag)生成的镜像名为
wat-web。标签使得我们可以更方便地引用和管理镜像。
--build-arg BUILD_ENV=beta: 这个选项用于传递构建时的参数。在这个例子中,传递了一个名为BUILD_ENV的构建参数,其值为beta。在 Dockerfile 中可以使用ARG指令来引用这个参数。
在 turbo.json 中增加 build:beta 的 task
diff1{
2  "$schema": "https://turbo.build/schema.json",
3  "tasks": {
4    "build": {
5      "dependsOn": ["^build"],
6      "inputs": ["$TURBO_DEFAULT$", ".env*"],
7      "outputs": [".next/**", "!.next/cache/**"]
8    },
9+    "build:beta": {
10+      "dependsOn": ["^build:beta"],
11+      "inputs": ["$TURBO_DEFAULT$", ".env*"],
12+      "outputs": [".next/**", "!.next/cache/**"]
13+    },
14    "lint": {
15      "dependsOn": ["^lint"]
16    },
17    "dev": {
18      "cache": false,
19      "persistent": true
20    }
21  }
22}
再执行pnpm build:docker:web:beta,耐心等待 docker 构建镜像。
可能出现的报错:
>> COPY --from=installer --chown=nextjs:nodejs /app/apps/${FOLDER_NAME}/public ./apps/${FOLDER_NAME}/public"/app/apps/web/public": not found
这个报错意思是 nextjs 有些版本安装后并没有 public 目录,这时候手动创建一下 public 目录即可。
public 目录内会存放一些图片等静态资源,往往这类静态资源我们会将其打包到 S3 等资源库中,并使用 cdn 进行缓存。这种好处是极大地节省网络资源消耗,浏览器可以根据 cdn 来设置 HTTP 缓存策略。
当构建成功后,使用以下命令,查看是否有一个叫wat-web的 image
shell1docker images
你应该可以看到这样的 image。
REPOSITORY TAG IMAGE ID CREATED SIZE wat-web latest 501286021b06 About a minute ago 196MB
使用命令 run 一个容器
shell1docker run -p 3000:3000 -d wat-web
现在打开 localhost:3000,你应该可以看到如下显示:
html
提交代码
shell1git add .
2git commit -m 'dockerize nextjs'
设置 Google Cloud
-
根据官方文档 下载安装 gcloud CLI
-
根据 官方文档设置 gcloud CLI,主要目的是在本地登录自己的 google account
-
创建一个 google cloud project
-
进入 console
-
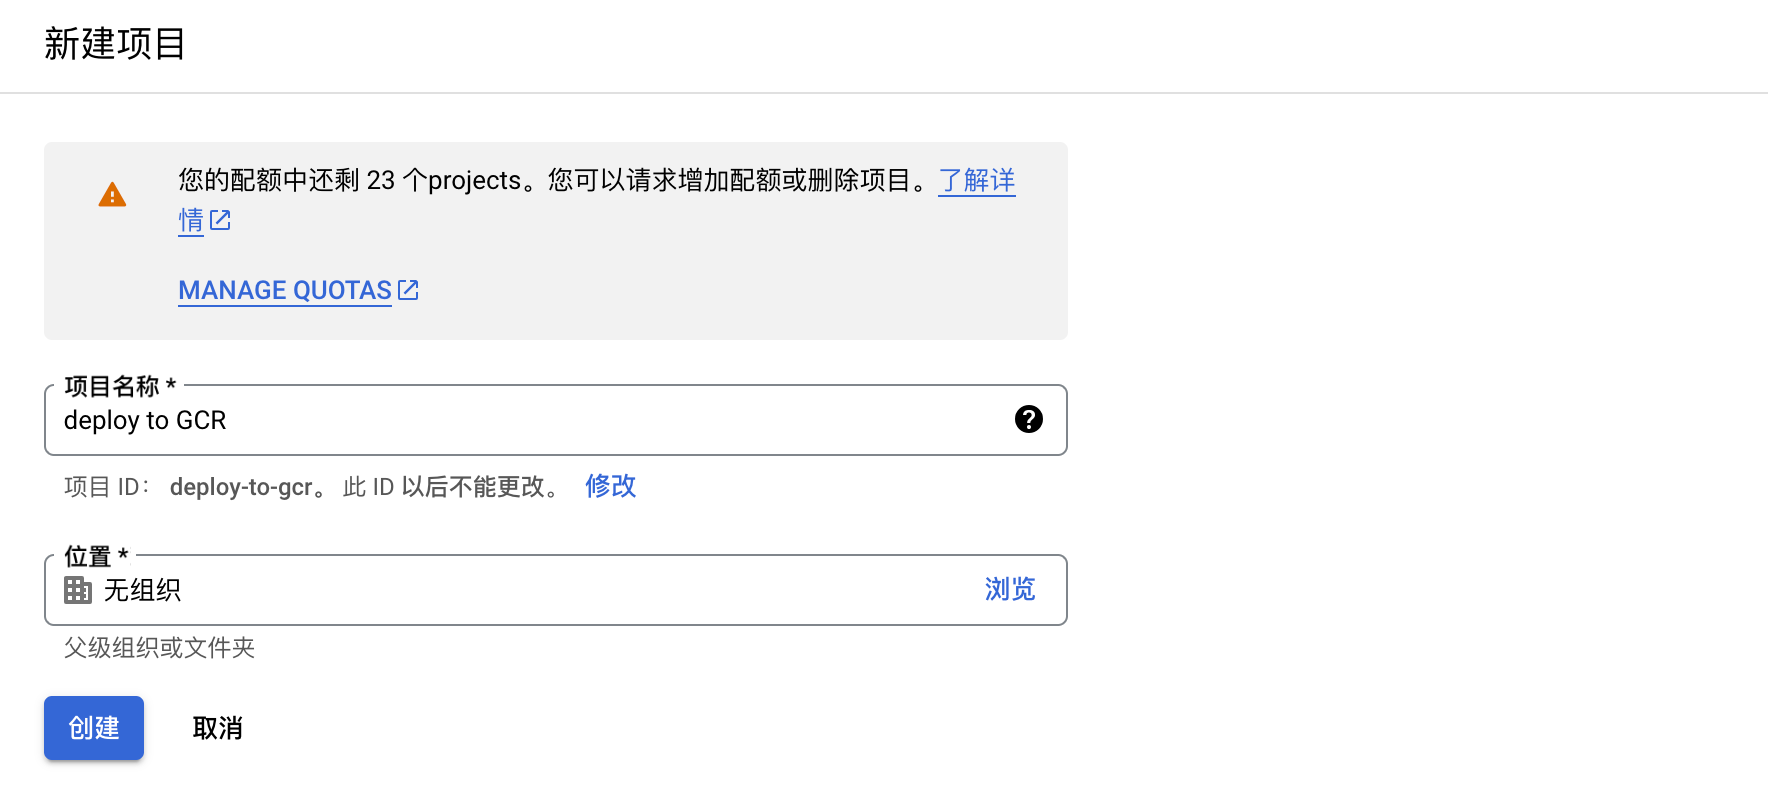
新建项目
-
设置项目名称
-
点击创建按钮
-
-
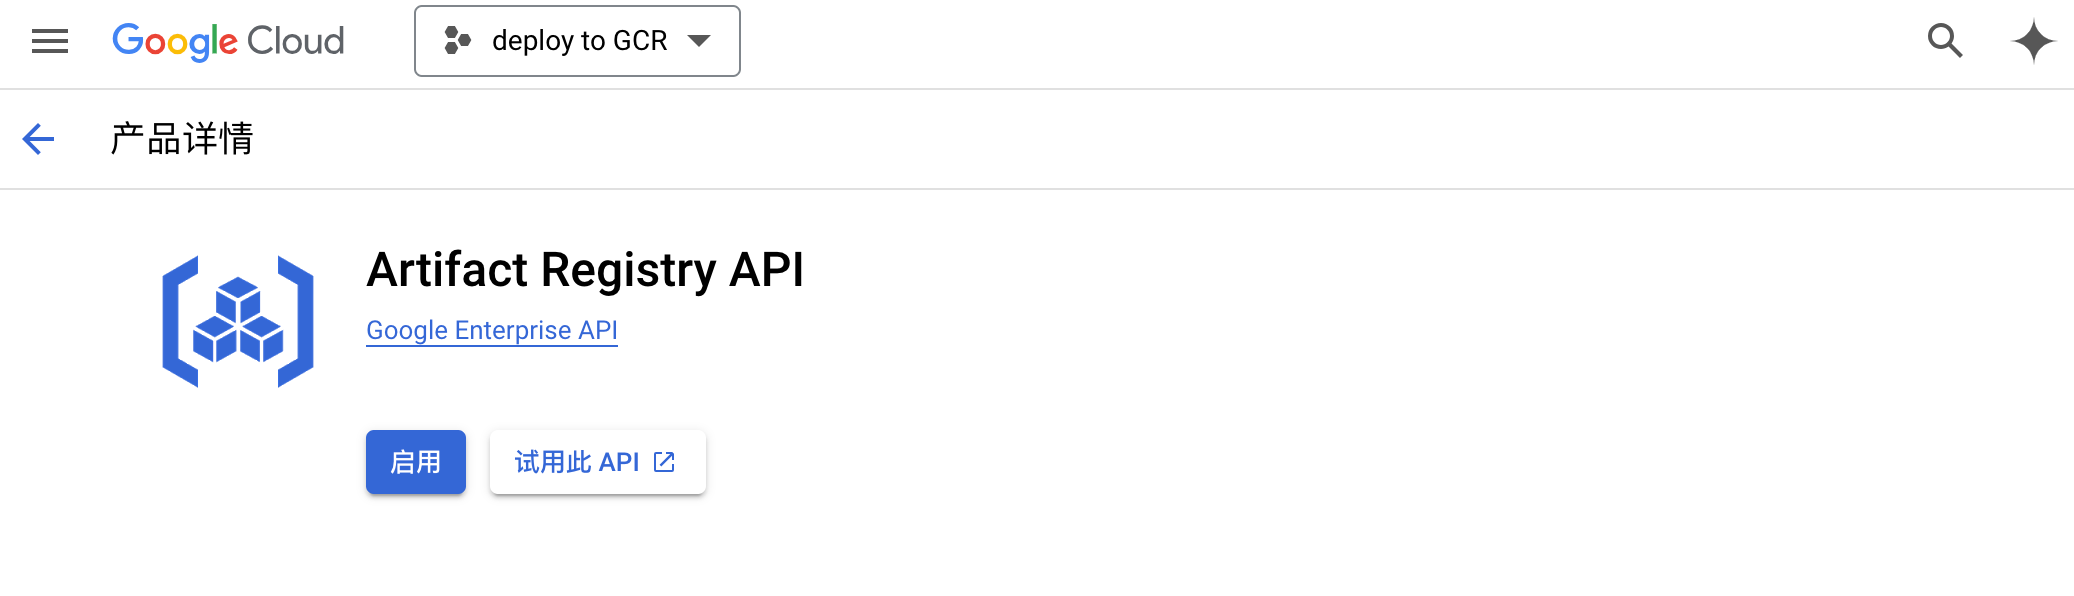
搜索 Artifact Registry,并开启 Artifact Registry API
-
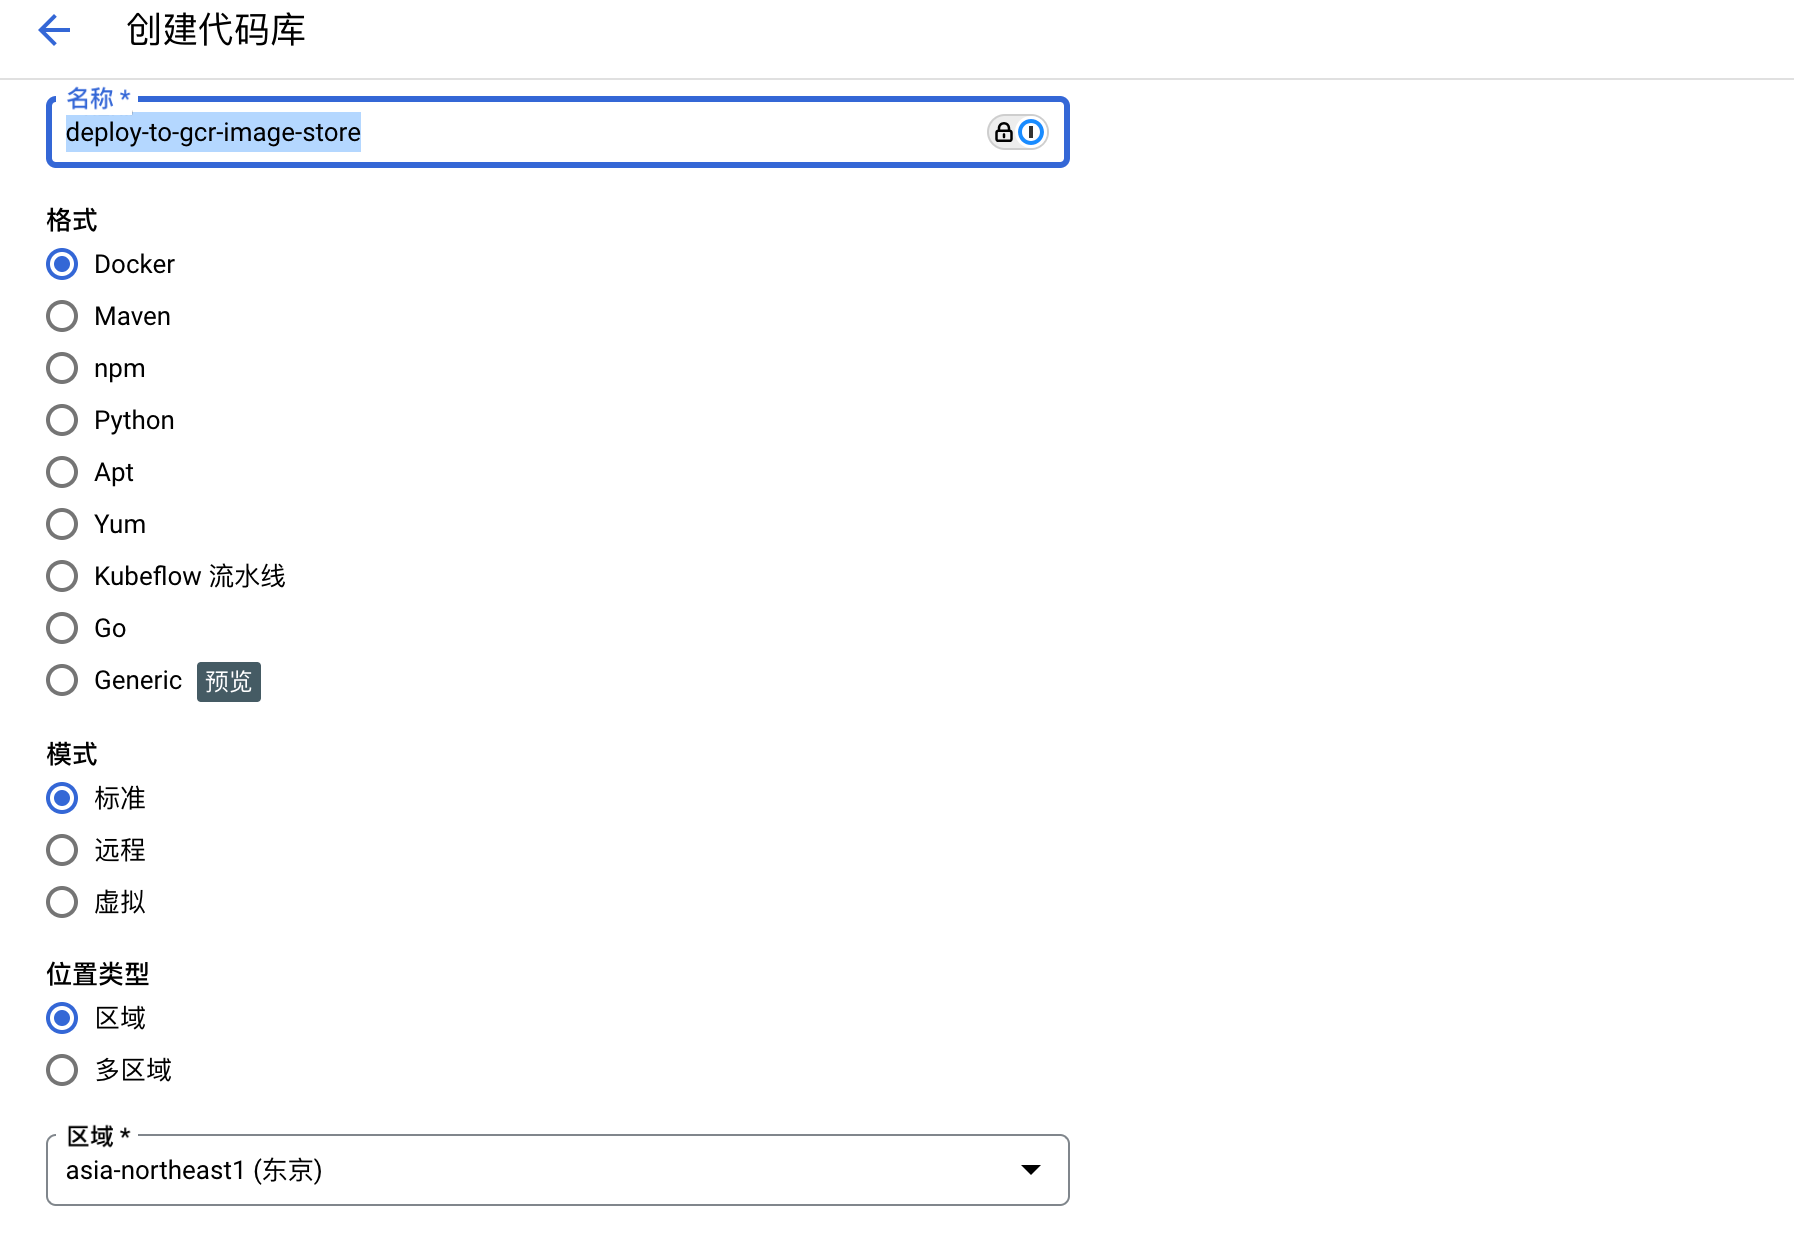
进入 Artifact Registry,创建一个代码库
-
gcloud config list 查看本地账户的 auth 以及 project 设置
可以通过
gcloud config set account <YOUR EMAIL>设置账户可以通过
gcloud config set project <PROJECT ID>设置项目
将 image 上传至 Artifact Registry
还记得我们之前构建的名为 wat-web 的 image 吗?
现在我们给它取个别名,格式为:
shell1docker tag IMAGE LOCATION-docker.pkg.dev/PROJECT_ID/REPOSITORY_NAME/IMAGE_NAME:TAG
替换以下内容:
LOCATION:存储库区域PROJECT_ID:您的 Google Cloud 项目 IDREPOSITORY_NAME:存储库名称IMAGE_NAME:镜像名称TAG:镜像标签(例如v1)
按照我的设定,示例为:
shell1docker tag wat-web asia-northeast1-docker.pkg.dev/deploy-to-gcr/deploy-to-gcr-image-store/wat-web:latest
再推送到 Artifact Registry
shell1docker push asia-northeast1-docker.pkg.dev/deploy-to-gcr/deploy-to-gcr-image-store/wat-web:latest
完成后,可以到 Artifact Registry 查看是否已有 image
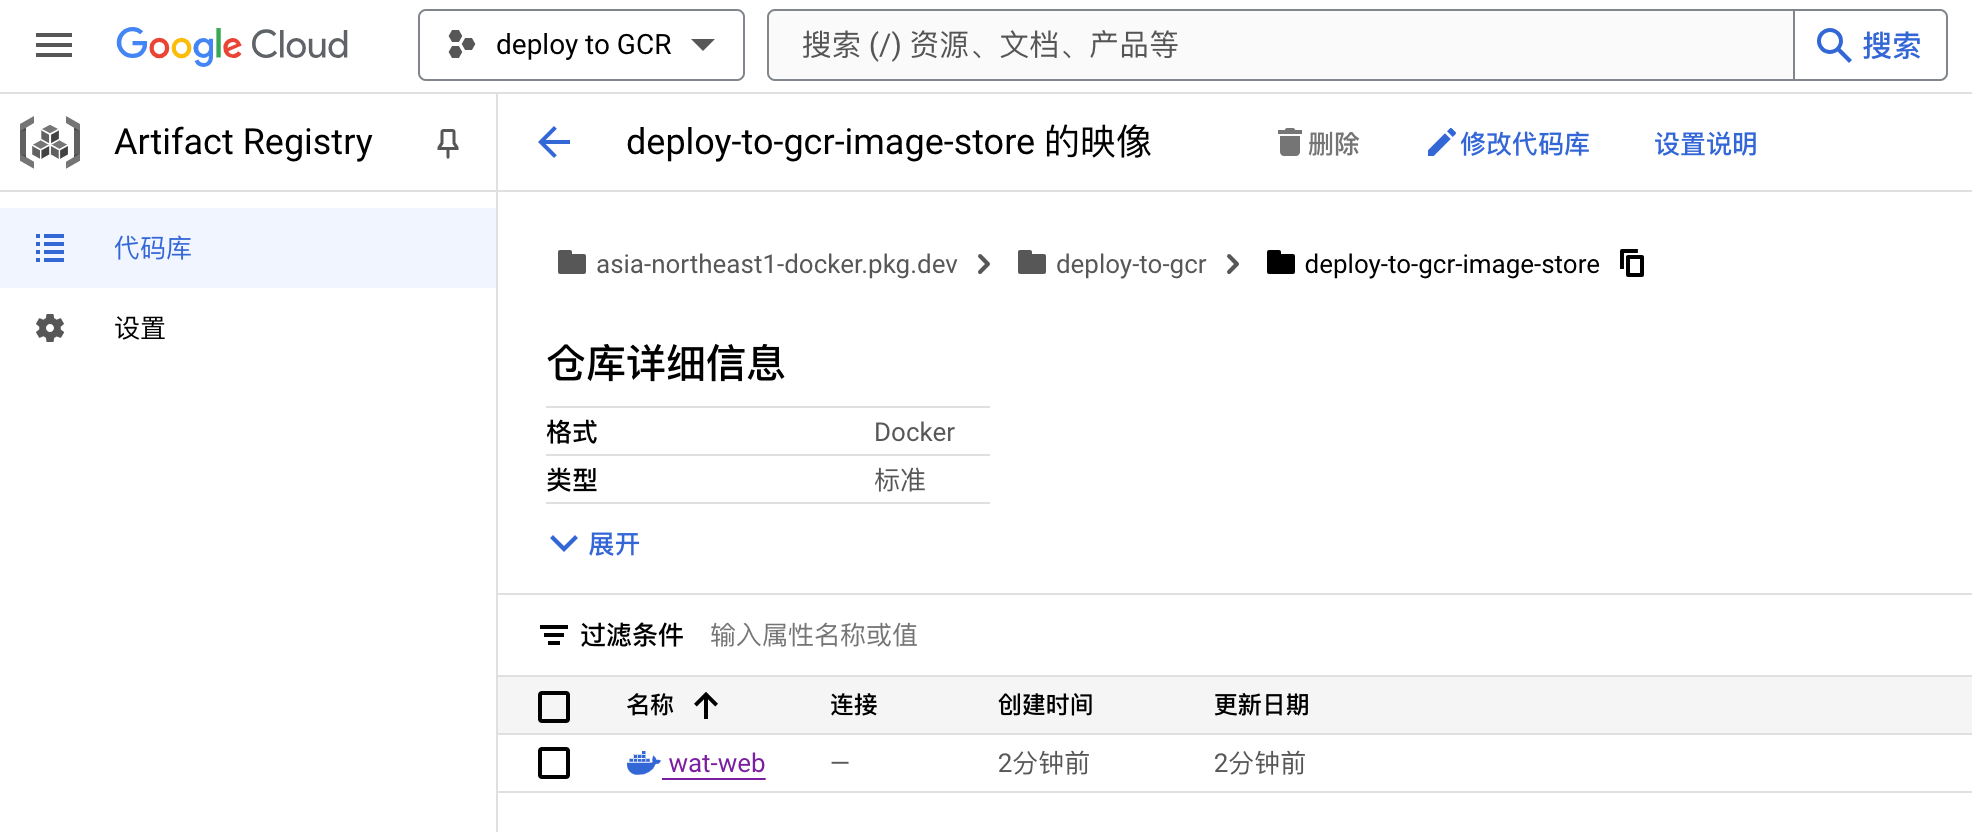
从 Artifact Registry 进行部署
部署命令为:
shell1gcloud run deploy SERVICE --image IMAGE_URL --platform managed --region REGION --min-instances 1 --allow-unauthenticated
例如按照我的配置,部署命令为:
shell1gcloud run deploy wat-web --image asia-northeast1-docker.pkg.dev/deploy-to-gcr/deploy-to-gcr-image-store/wat-web:latest --platform managed --allow-unauthenticated --min-instances 1
等待部署完成后,进入 Cloud Run 界面
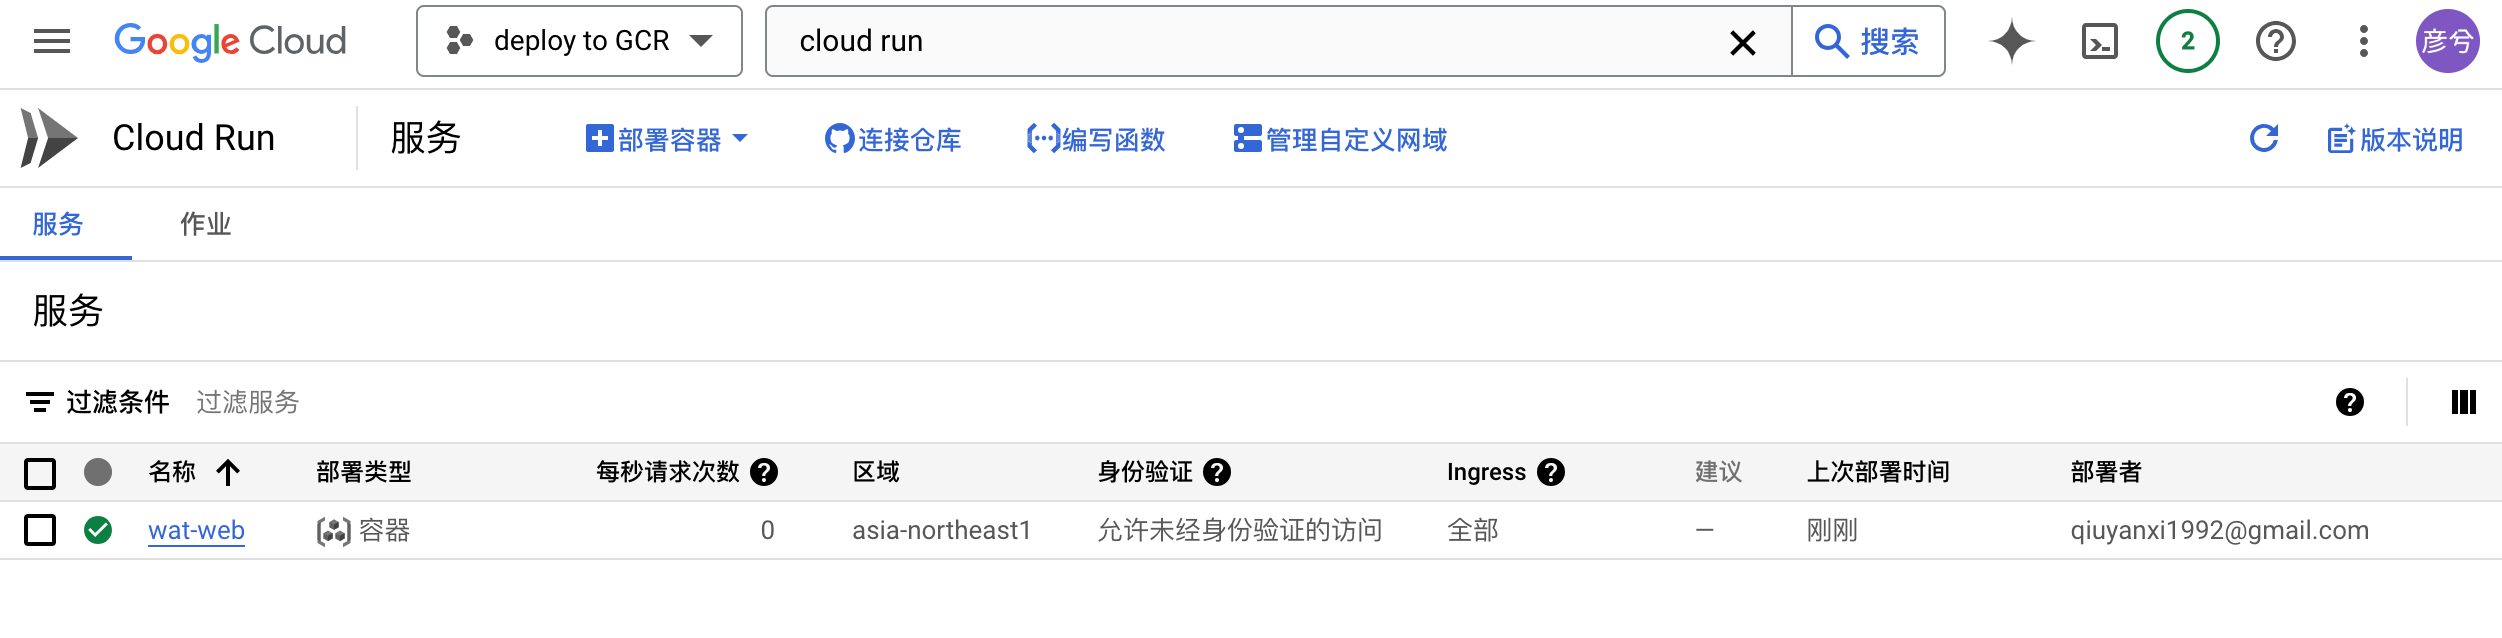
点击进入 wat-web 中查看 google 给我们分配的网址。

最终的结果应该为
html
使用 Nginx 实现前端代理
使用 Nginx 对前端代理,可以添加 gzip 压缩或者将 HTTP/1 升级到 HTTP/2,又或者可以实现 HTTP 缓存,非常方便。
基本思路是:Nginx 容器作为主服务容器在每个 Cloud Run 实例上运行,并且配置为将请求转发到作为 Sidecar 容器运行的应用容器。
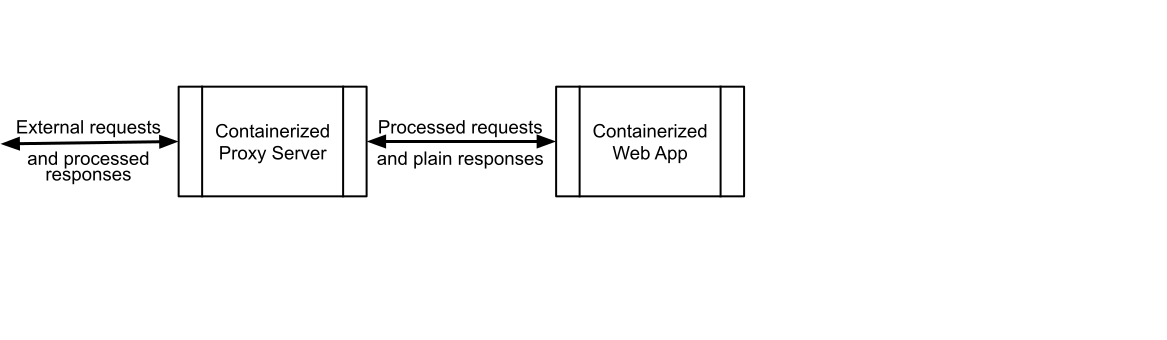
在 Cloud Run 中进行前端代理的最有效方法是将 Nginx 服务器代理服务器容器和 Web 应用容器部署为单个 Cloud Run 服务。
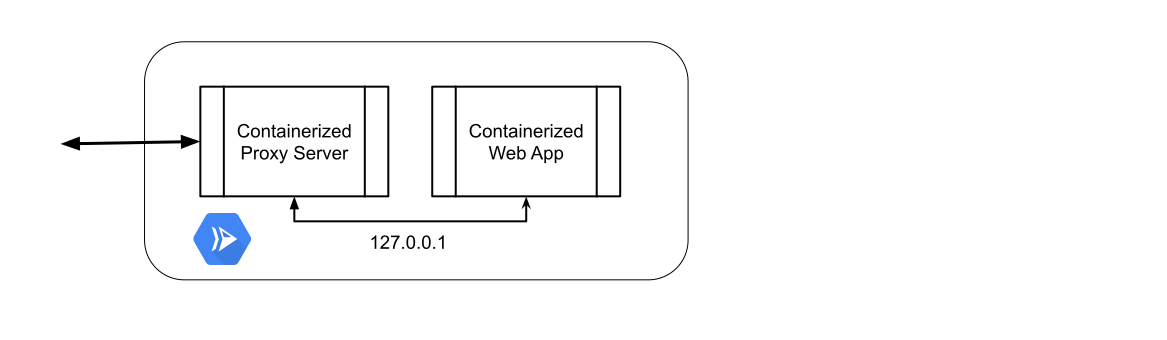
此单个 Cloud Run 服务接受请求并将其传送到入站流量(服务)容器(代理服务器)。然后,代理服务器通过 localhost 网络接口向 Web 应用发送请求,以避免经过任何外部网络。
部署为单个 Cloud Run 服务可以缩短延迟时间,减少服务管理开销,并且可消除外部网络暴露。Cloud Run 不会直接与 Sidecar 容器交互,除了在服务启动或停止时启动或停止 Sidecar 容器。
条件:
- 开启 Cloud Run 和 Secret Manager APIs.
- 更新 Google Cloud CLI:
gcloud components update - 配置 Google Cloud CLI:
gcloud init - 使用 Google Cloud CLI 进行身份验证:
gcloud auth login
权限要求:Cloud Run Admin 和 Service Account User 角色
步骤:
-
在项目的根目录创建
nginx.conf文件,内容为:nginx1server { 2 # Listen at port 8080 3 listen 8080; 4 # Server at localhost 5 server_name _; 6 # Enables gzip compression to make our app faster 7 gzip on; 8 9 location / { 10 # Passes initial requests to port 8080 to `hello` container at port 8888 11 proxy_pass http://127.0.0.1:8888; 12 } 13} -
进入 Google Cloud 控制台中的 Secret Manager 页面
-
创建 Secret,name 字段中输入
nginx_config -
将 nginx.conf 文件作为值上传给 secret
-
创建密钥
-
进入 IAM 页面,找到 Default compute service account 的 service-account。
-
添加角色 Secret Manager Secret Accessor以授予对此新 Secret 的访问权限。
-
点击保存。
-
打开项目根目录,执行
gcloud run services describe SERVICE --format export > service.yaml以下载最新的 service 信息,(根据之前的设置,SERVICE 替换成wat-web) -
检查一下 service.ymal 文件,确保以下内容没有遗漏
yml1metadata: 2 name: 'MC_SERVICE_NAME' 3 labels: 4 cloud.googleapis.com/location: 'REGION' 5 annotations: 6 # Required to use Cloud Run multi-containers (preview feature) 7 run.googleapis.com/launch-stage: BETA 8 run.googleapis.com/description: sample tutorial service 9 # Externally available 10 run.googleapis.com/ingress: all -
附加以下内容:
yml1spec: 2 template: 3 metadata: 4 annotations: 5 # 默认生成的容器名为 web-1 6 run.googleapis.com/container-dependencies: '{nginx: [web-1]}'container-dependencies用于指示 Cloud Run 在启动 nginx 容器之前先等待 web-1 容器启动。否则,如果 nginx 容器先启动,它可能会尝试将 Web 请求代理到尚未准备就绪的 Web 应用容器,这将生成 Web 错误响应。每个容器都可以视需要定义一个名称属性,该属性可用于在其他指令中引用它。服务容器运行名为
nginx的代理服务器。这是 Cloud Run 将传入请求发送到的容器,因此必须指定HTTP的版本以及要将传入请求发送到的容器端口。 -
指定容器配置
yml1spec: 2 containers: 3 # A) Serving ingress container "nginx" listening at PORT 8080 4 # Main entrypoint of multi-container service. 5 # Source is stored in nginx_config secret in Secret Manager. 6 # Any pings to this container will proxy over to hello container at PORT 8888. 7 # https://cloud.google.com/run/docs/container-contract#port 8 - image: nginx 9 name: nginx 10 ports: 11 - name: http1 12 containerPort: 8080 13 resources: 14 limits: 15 cpu: 500m 16 memory: 256Mi 17 # Referencing declared volume below, 18 # Declaring volume to mount in current ingress container's filesystem 19 # https://cloud.google.com/run/docs/reference/rest/v2/Container#volumemount 20 volumeMounts: 21 - name: nginx-conf-secret 22 readOnly: true 23 mountPath: /etc/nginx/conf.d/ 24 startupProbe: 25 timeoutSeconds: 240 26 periodSeconds: 240 27 failureThreshold: 1 28 tcpSocket: 29 port: 8080 -
指定 sidecar 容器的配置(即我们打包的 nextjs 项目的配置)
yml1- image: LOCATION-docker.pkg.dev/PROJECTID/IMAGE/TARGET
2  # 默认生成的容器名为 web-1
3  name: web-1
4  env:
5    - name: PORT
6      value: '8888'
7  resources:
8    limits:
9      cpu: 1000m
10      memory: 512Mi
11  startupProbe:
12    timeoutSeconds: 240
13    periodSeconds: 240
14    failureThreshold: 1
15    tcpSocket:
16      port: 8888
请将上述的大写字母替换为自己的项目配置。
-
指定 secret 的
volumeyml1volumes: 2 - name: nginx-conf-secret 3 secret: 4 secretName: nginx_config 5 items: 6 - key: latest 7 path: default.conf -
执行
gcloud run services replace service.yaml进行部署。 -
检验 nginx 是否成功:
-
查看 url Network 的 url 是否有 gzip、是否有 cache-control 和 etag。
-
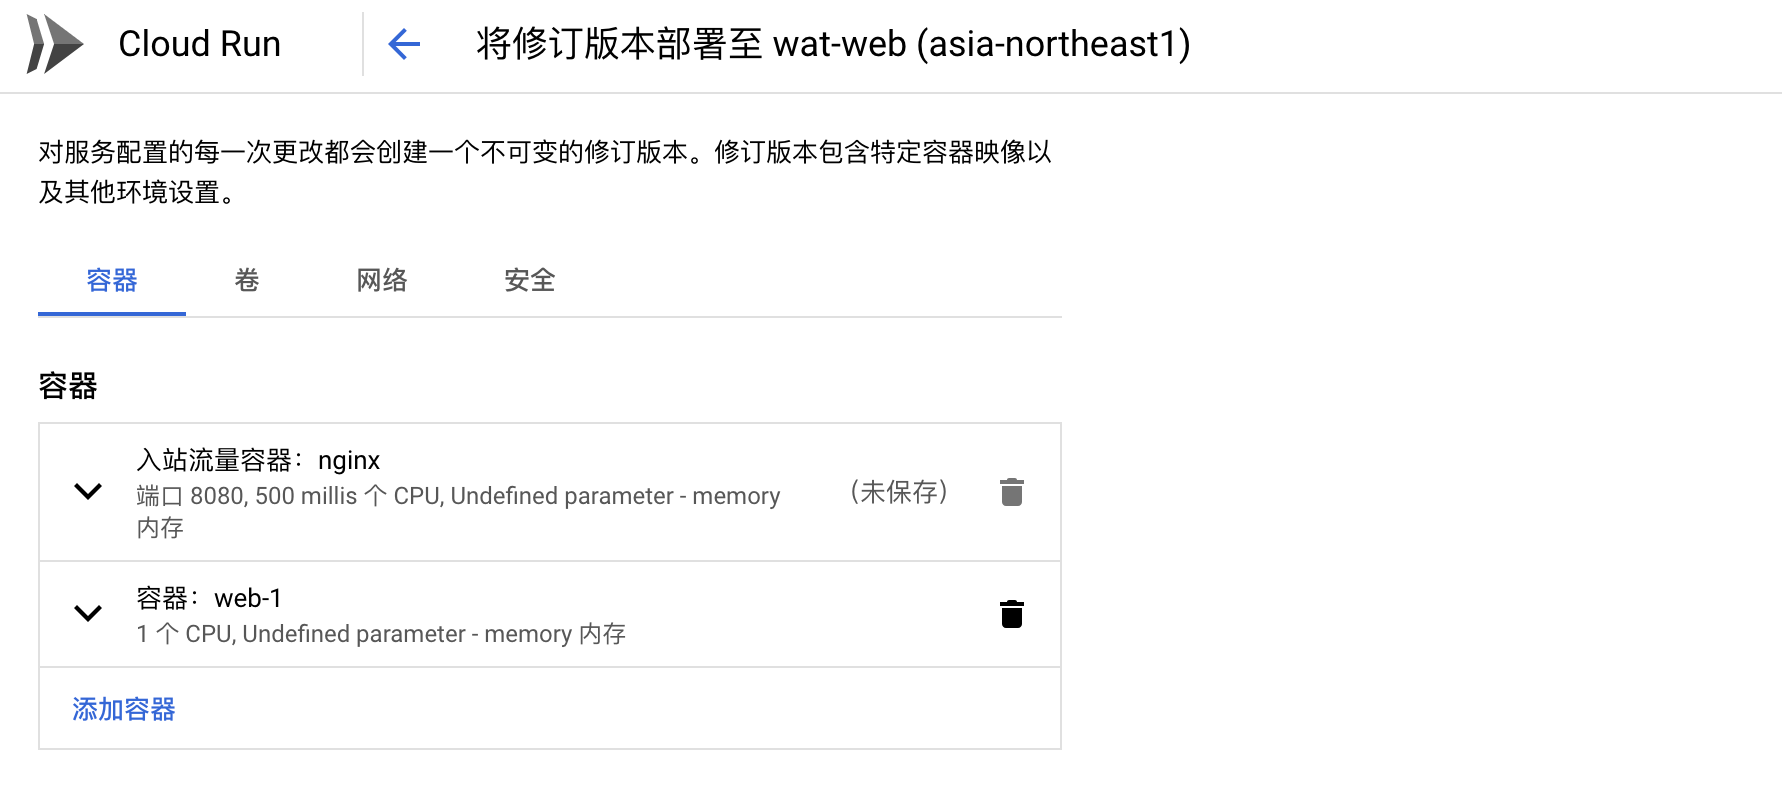
查看 Cloud Run 是否为多容器

-
进入 Cloud Run,点击 修改和部署新的修订版本,查看是否有 nginx 容器
-
在 Google Cloud 中,
service.yaml通常是用于配置 Google Cloud 服务(例如 Google Kubernetes Engine 或 Cloud Run)的部署文件。这个文件定义了服务的配置和运行参数。
如果对 service.yaml 的配置有疑问,请查看 service.yaml example
配置 CDN 缓存静态资源
条件:
- 一个具有 S3 和 Cloud front 权限的 aws 账户
通过S3 与 CloudFront 配合分发资源这篇文章配置好 AWS 的 CDN 服务。
后面只需要将 nextjs 中的 public 目录中的静态资源都上传至 S3 即可。
那我们该如何将静态资源自动上传到 S3 呢?
方法很多种,我们先查看 nextjs 打包后的文件结构。
通过 docker Desktop,我们可以看到容器的文件目录:
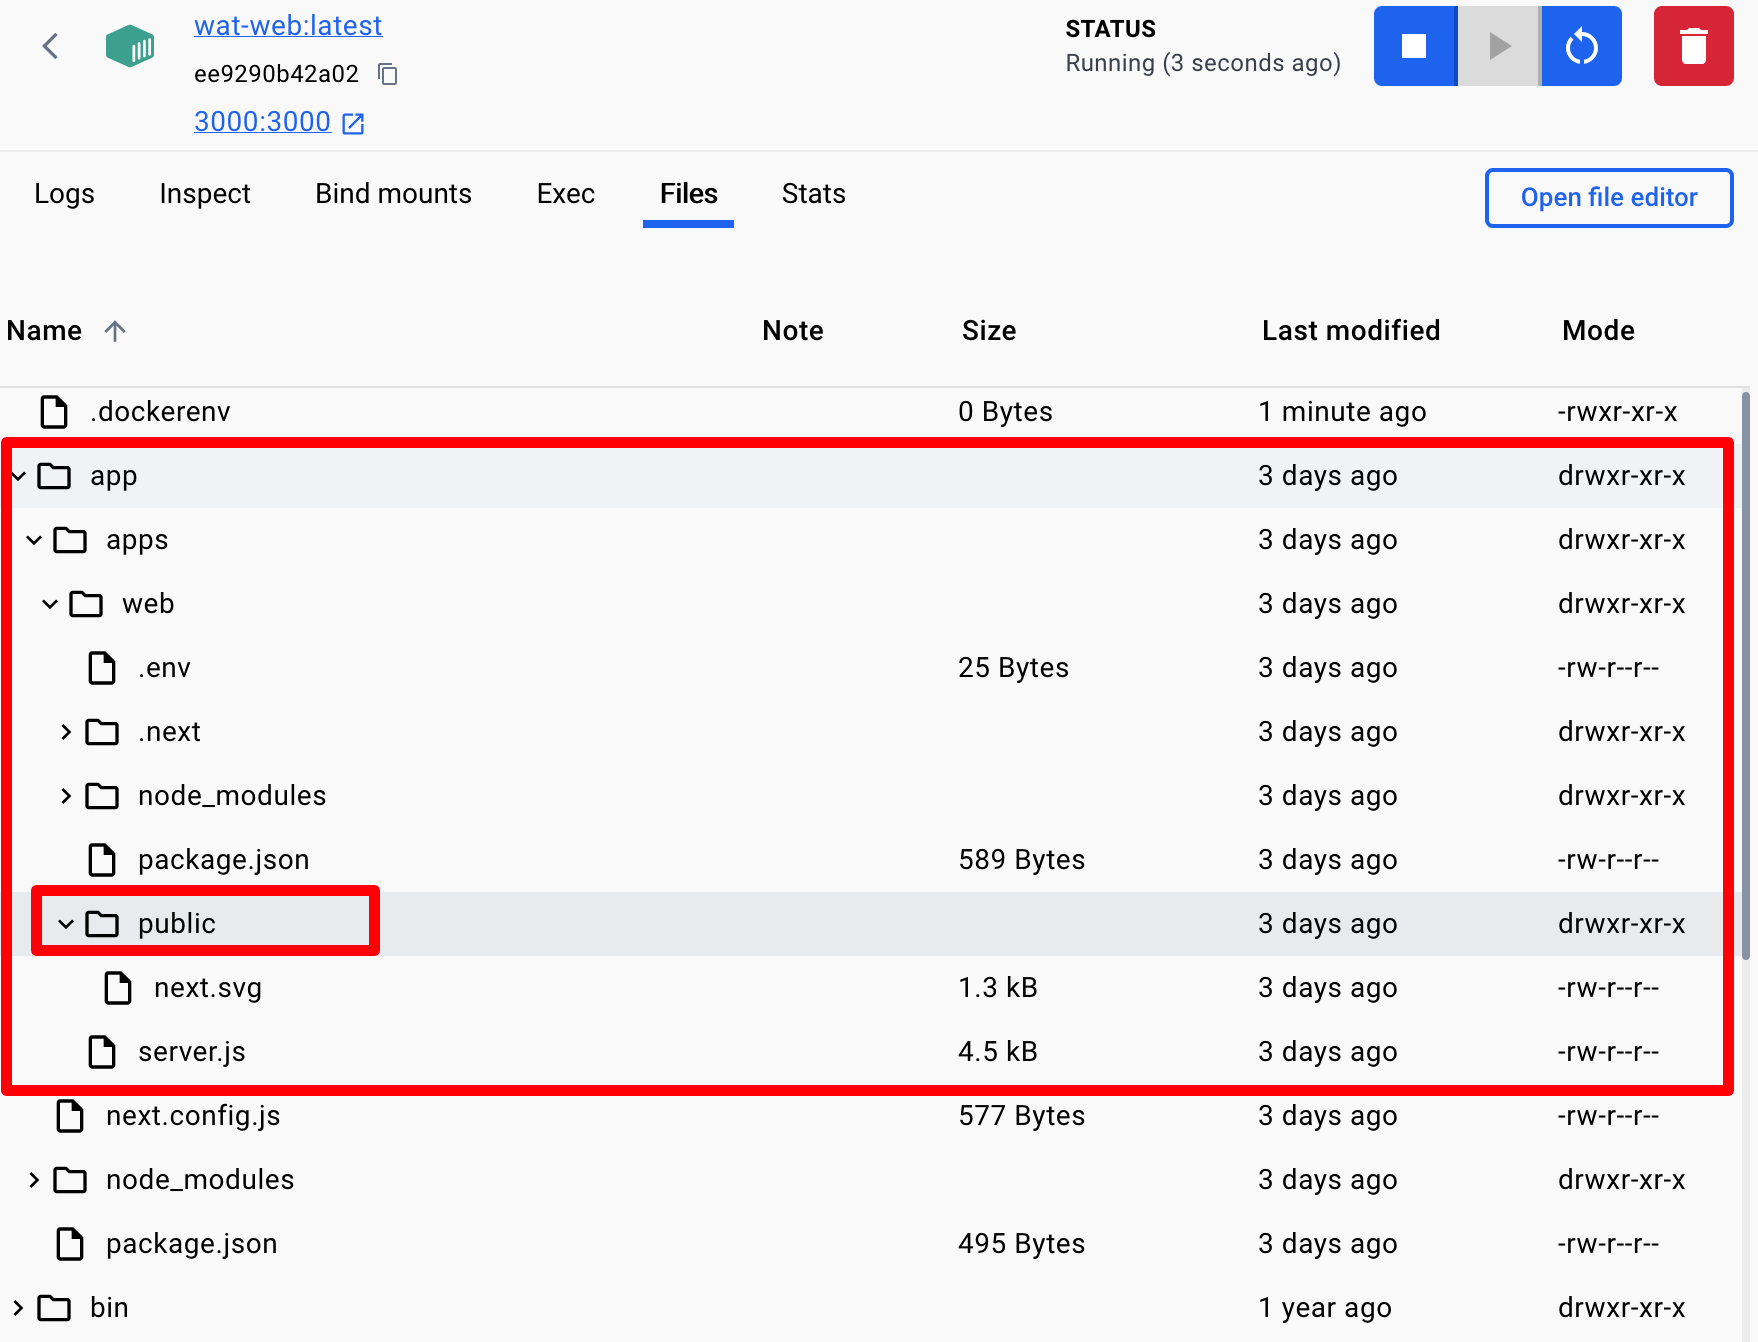
在app/apps/web/public里的就是我们的静态资源,如果我们能够在 build 成 image 时,创建一个新的容器,但不启动它(命令是docker create),然后把容器内的这部分资源拷贝下来,用脚本自动上传至 AWS S3,再删除容器,我们的目的不就达成了吗?
通过 github action 的 CI/CD 我们可以做到这一点。
GitHub Action CI/CD
GitHub Action 有很多作用,我们可以把上面所有手动操作的内容都给脚本化。
流程是这样的:
- 提交代码至某个分支
- 验证 gcloud auth
- build image 并推送至 Artifact Registry
- 创建一个 Container 并拷贝出 public 文件夹里所有内容
- 验证 aws 的 auth
- 将拷贝的内容上传至 s3
- 为了刷新 cdn,invalidate cloudfront
- 最后用
gcloud run services replace service.yaml部署多容器 nextjs 应用。
示例:
yml1name: Build and Deploy Beta to Google Cloud Run
2
3on:
4  push:
5    branches:
6      - beta
7
8env:
9  GC_PROJECT_ID: central-beach-430219-e4
10  GC_IMAGE_REPO_NAME: web-application-template
11  GC_WEB_NAME: web
12  GC_AR_LOCATION: asia-northeast1
13  GC_REGION: asia-northeast1
14  AWS_S3_CDN_BUCKET: static-web-application-template
15  AWS_REGION: ap-northeast-1
16
17jobs:
18  build-web:
19    timeout-minutes: 10
20    runs-on: ubuntu-latest
21    environment: beta
22
23    steps:
24      - name: Checkout code
25        uses: actions/checkout@v4
26        with:
27          fetch-depth: 2
28          ref: beta
29
30      - name: Set up Docker Buildx
31        uses: docker/setup-buildx-action@v3
32
33      - name: Cache with docker buildx
34        id: cache-docker-buildx
35        uses: actions/cache@v4
36        with:
37          path: /tmp/.buildx-cache
38          key: web-docker-${{ runner.os }}-${{ hashFiles('**/package.json') }}-${{ hashFiles('**/pnpm-lock.yaml') }}
39          restore-keys: |
40            ${{ runner.os }}-build-web-docker
41            ${{ runner.os }}-build-
42
43      - name: google auth
44        id: 'auth'
45        uses: 'google-github-actions/auth@v2'
46        with:
47          credentials_json: '${{ secrets.GCLOUD_SERVICE_ACCOUNT_KEY }}'
48
49      - name: Set up gcloud
50        uses: google-github-actions/setup-gcloud@v2
51
52      - name: 'Use gcloud CLI'
53        run: 'gcloud auth list'
54
55      - name: 'Docker auth'
56        run: gcloud auth configure-docker ${{ env.GC_REGION }}-docker.pkg.dev --quiet
57
58      - name: Build image and push to GAR
59        uses: docker/build-push-action@v5
60        env:
61          GAR_REGISTRY: ${{ env.GC_AR_LOCATION }}-docker.pkg.dev/${{ env.GC_PROJECT_ID }}
62          GAR_TAG: ${{ github.run_number }}
63          GAR_REPO: ${{ env.GC_IMAGE_REPO_NAME }}/${{ env.GC_WEB_NAME }}
64        with:
65          context: .
66          file: apps/web/Dockerfile
67          push: true
68          build-args: BUILD_ENV=beta
69          tags: |
70            ${{env.GAR_REGISTRY}}/${{env.GAR_REPO}}:${{env.GAR_TAG}}
71          cache-from: type=local,src=/tmp/.buildx-cache
72          cache-to: type=local,dest=/tmp/.buildx-cache
73
74      - name: Setup aws
75        uses: aws-actions/configure-aws-credentials@v4
76        with:
77          aws-access-key-id: ${{ secrets.AWS_ACCESS_KEY_ID }}
78          aws-secret-access-key: ${{ secrets.AWS_SECRET_ACCESS_KEY }}
79          aws-region: ${{ env.AWS_REGION }}
80          mask-aws-account-id: 'false'
81
82      - name: copy content out of docker image
83        run: |
84          mkdir -p ./static
85          docker create --name web ${{ env.GC_AR_LOCATION }}-docker.pkg.dev/${{ env.GC_PROJECT_ID }}/${{ env.GC_IMAGE_REPO_NAME }}/${{ env.GC_WEB_NAME }}
86          docker cp web:/app/apps/web/public/. ./static
87          docker rm web
88
89      - name: copy static content to s3
90        run: |
91          aws s3 sync ./static s3://${{env.AWS_S3_CDN_BUCKET}}/web --delete
92
93      - name: invalidate cloudfront
94        env:
95          CLOUDFRONT_DISTRIBUTION_ID: ${{ secrets.CLOUDFRONT_DISTRIBUTION_ID }}
96        run: |
97          aws cloudfront create-invalidation --distribution-id $CLOUDFRONT_DISTRIBUTION_ID --paths "/web/*"
98
99  deploy-apps:
100    runs-on: ubuntu-latest
101    needs: [build-web]
102    timeout-minutes: 10
103    environment: beta
104    permissions:
105      contents: read
106      packages: write
107      id-token: write
108      pull-requests: write
109      statuses: write
110
111    steps:
112      - name: Checkout
113        uses: actions/checkout@v4
114        with:
115          ref: beta
116
117      - id: 'auth'
118        uses: 'google-github-actions/auth@v2'
119        with:
120          credentials_json: '${{ secrets.GCLOUD_SERVICE_ACCOUNT_KEY }}'
121
122      - name: Set up gcloud
123        uses: google-github-actions/setup-gcloud@v2
124
125      - name: 'Docker auth'
126        run: gcloud auth configure-docker ${{ env.GC_REGION }}-docker.pkg.dev --quiet
127
128      - name: Deploy web
129        run: |
130          gcloud run services replace service.yaml
131           # gcloud run deploy ${{env.GC_WEB_NAME}} \
132           # --image ${{ env.GC_AR_LOCATION }}-docker.pkg.dev/${{ env.GC_PROJECT_ID }}/${{ env.GC_IMAGE_REPO_NAME }}/${{ env.GC_WEB_NAME }} \
133           # --platform managed --region ${{ env.GC_REGION }} \
134           # --allow-unauthenticated \
135           # --min-instances 1
最后
完整的示例项目在此