 Oh-My-Note
Pipe
使用内置 Pipe
在参数传递给 handler 之前,使用 Pipe 能够对参数做一些验证和转换。
可以使用 @UsePipes(ParseIntPipe)这种显式语法来使用 Pipe。
有很多内置的 Pipe:
- ValidationPipe:对参数做校验的 Pipe
- ParseIntPipe:将参数转化为整数的 Pipe
- ParseBoolPipe:将参数转化为布尔值的 Pipe
- ParseArrayPipe:将参数转化为 Array 的包,需要下载额外的包
- ParseUUIDPipe:校验参数是否为 uuid 的包。
- DefaultValuePipe:当没有参数时默认提供一个参数
- ParseEnumPipe:参数限定为定义好的枚举
- ParseFloatPipe:将参数转化为 float
- ParseFilePipe:文件相关的 pipe
他们都实现了 PipeTransform 接口。
比如 ParseIntPipe 的源码是这样的:
我们使用这个 Pipe 能够把参数修改成数字。
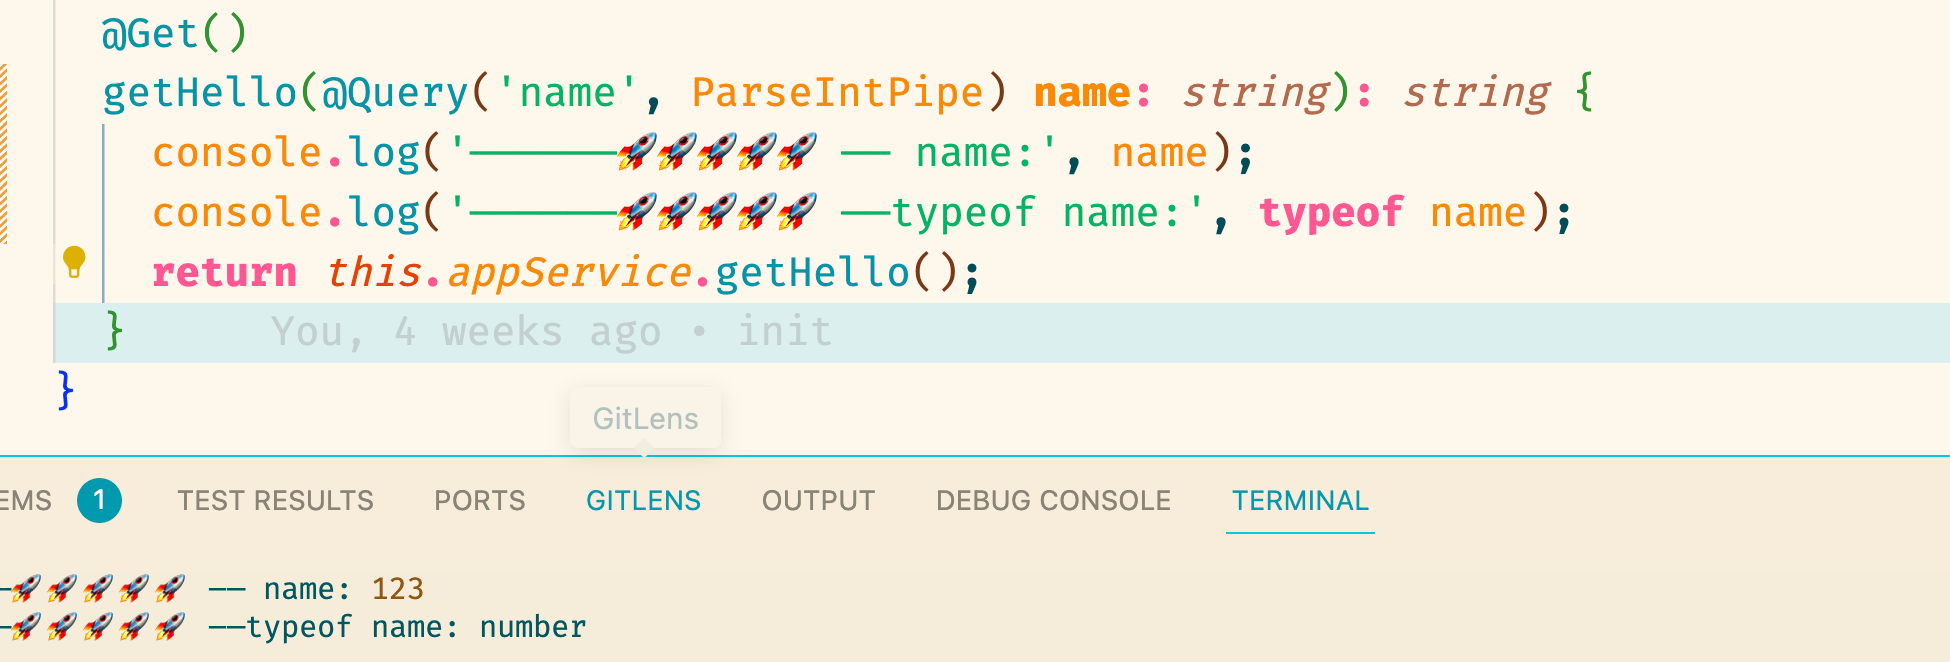
如果传递的 name 不能转化为 number 的话,nest 会返回一个错误。
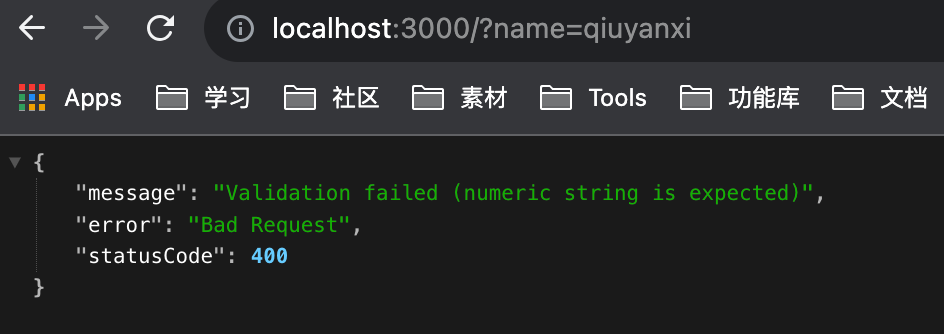
想要修改这样的行为,需要使用 new XXXPipe 的方式:
typescript1  @Get()
2  getHello(
3    @Query(
4      'name',
5      new ParseIntPipe({
6        errorHttpStatusCode: HttpStatus.FORBIDDEN,
7      }),
8    )
9    name: string,
10  ): string {
11    console.log('——————🚀🚀🚀🚀🚀 —— name:', name);
12    console.log('——————🚀🚀🚀🚀🚀 ——typeof name:', typeof name);
13    return this.appService.getHello();
14  }
比如上面的方式就将错误时的状态码改为了 403。
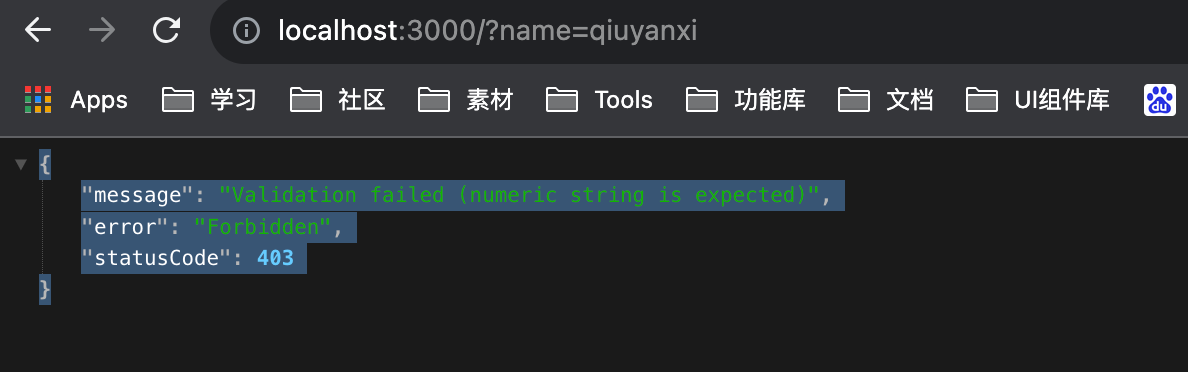
此外,还能够同时指定状态码和状态信息:
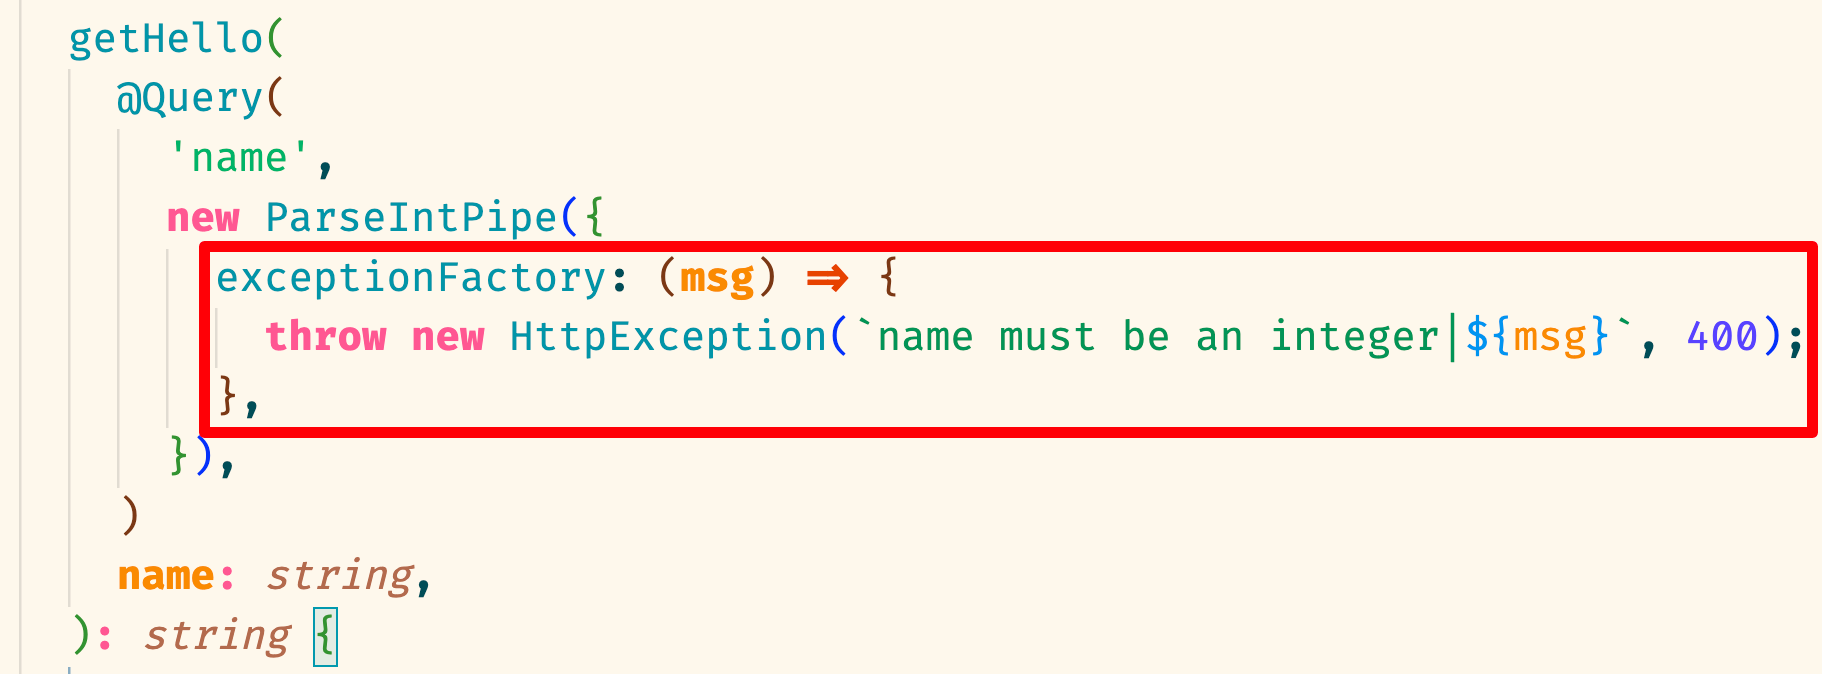
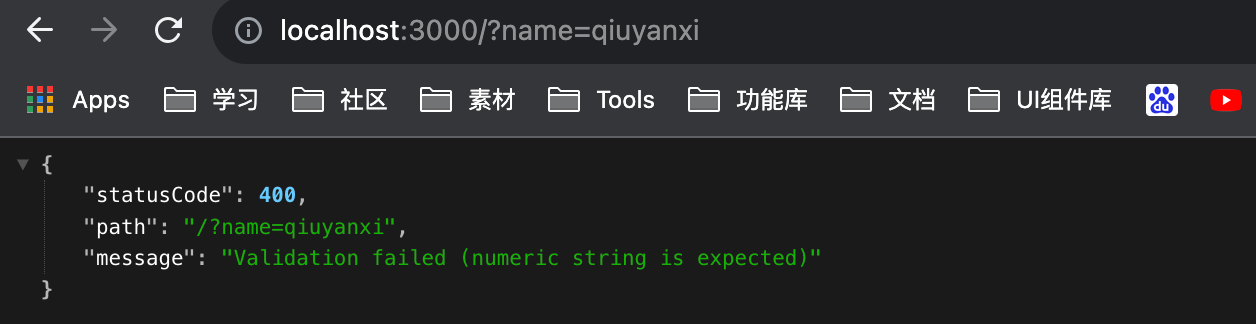
你也可以加个 @UseFilters 来使用自己的 exception filter 处理。
typescript1  @Get()
2  @UseFilters(ApiExceptionFilter)
3  getHello(
4    @Query('name', ParseIntPipe)
5    name: string,
6  ): string {
7    console.log('——————🚀🚀🚀🚀🚀 —— name:', name);
8    console.log('——————🚀🚀🚀🚀🚀 ——typeof name:', typeof name);
9    return this.appService.getHello();
10  }
ApiExceptionFilter 的代码为:
typescript1import { ArgumentsHost, Catch, ExceptionFilter, HttpException } from '@nestjs/common'
2
3@Catch()
4export class ApiExceptionFilter implements ExceptionFilter {
5  catch(exception: HttpException, host: ArgumentsHost) {
6    const ctx = host.switchToHttp()
7    const response = ctx.getResponse()
8    const request = ctx.getRequest()
9    const status = exception.getStatus()
10
11    response.status(status).json({
12      statusCode: status,
13      path: request.url,
14      message: exception.message,
15    })
16  }
17}
使用自定义 Pipe
生成自定义 Pipe
bash1nest generate pipe aaa --no-spec
通过生成后的代码可以看出自定义 Pipe 需要 implements PipeTransform接口,并且实现 transform 方法。
我们用自定义 Pipe 来返回 aaa试试:
typescript1import { ArgumentMetadata, Injectable, PipeTransform } from '@nestjs/common'
2
3@Injectable()
4export class AaaPipe implements PipeTransform {
5  transform(value: any, metadata: ArgumentMetadata) {
6    console.log('——————🚀🚀🚀🚀🚀 —— value:', value)
7    console.log('——————🚀🚀🚀🚀🚀 —— metadata:', metadata)
8    return 'aaa'
9  }
10}
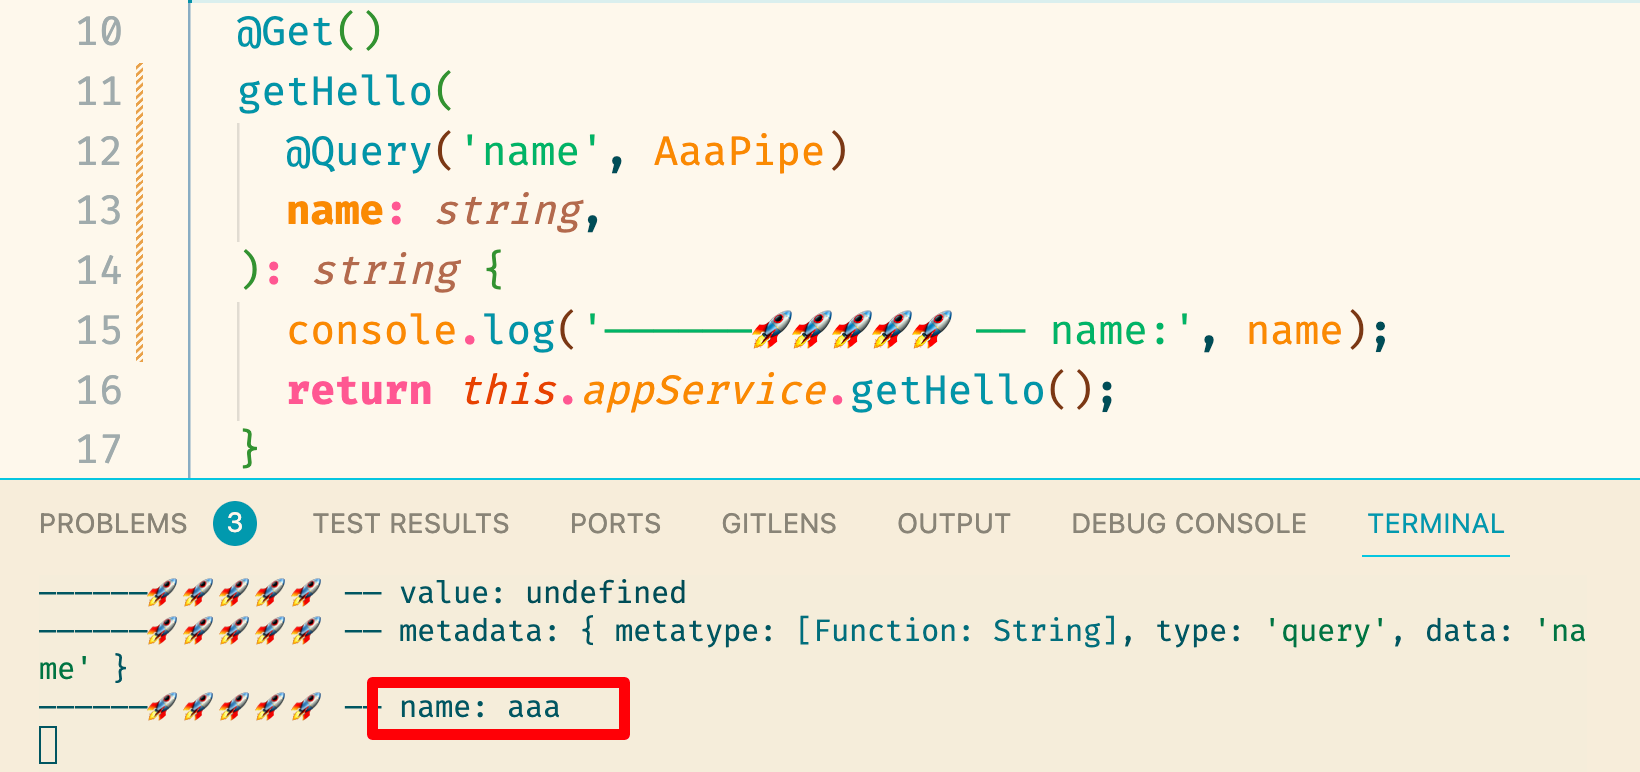
使用这个 Pipe 时,可以看到参数取得的结果是该 Pipe 的返回值。也就是说 pipe 的返回值就是传给 handler 的参数值。
typescript1  @Get()
2  getHello(
3    @Query('name', AaaPipe)
4    name: string,
5  ): string {
6    console.log('——————🚀🚀🚀🚀🚀 —— name:', name);
7    return this.appService.getHello();
8  }
validationPipe
validationPipe 用于验证传入的数据。它基于类似于 class-validator 的库来执行验证。
先下载两个相关的包:
bash1pnpm install class-validator class-transformer
再创建一个 dto 对象(数据传输对象)。
typescript1// src/dto/person.dto.ts
2export class Person {
3  name: string
4  age: number
5}
对于该 dto 对象,我们想要验证 age 是 number,可以从 class-validator 包里取到@IsInt 装饰器。
typescript1import { IsInt } from 'class-validator'
2
3export class Person {
4  name: string
5  @IsInt()
6  age: number
7}
然后再使用:
typescript1...
2import { Person } from './dto/person.dto';
3
4@Post()
5  @UsePipes(ValidationPipe)
6  getHello(
7    @Body()
8    person: Person,
9  ): string {
10    console.log('——————🚀🚀🚀🚀🚀 —— person:', person);
11    return this.appService.getHello();
12  }
现在我们已经使用了 ValidationPipe ,并且已经把想要验证的内容写到了 dto 对象里。
请求一下看看:
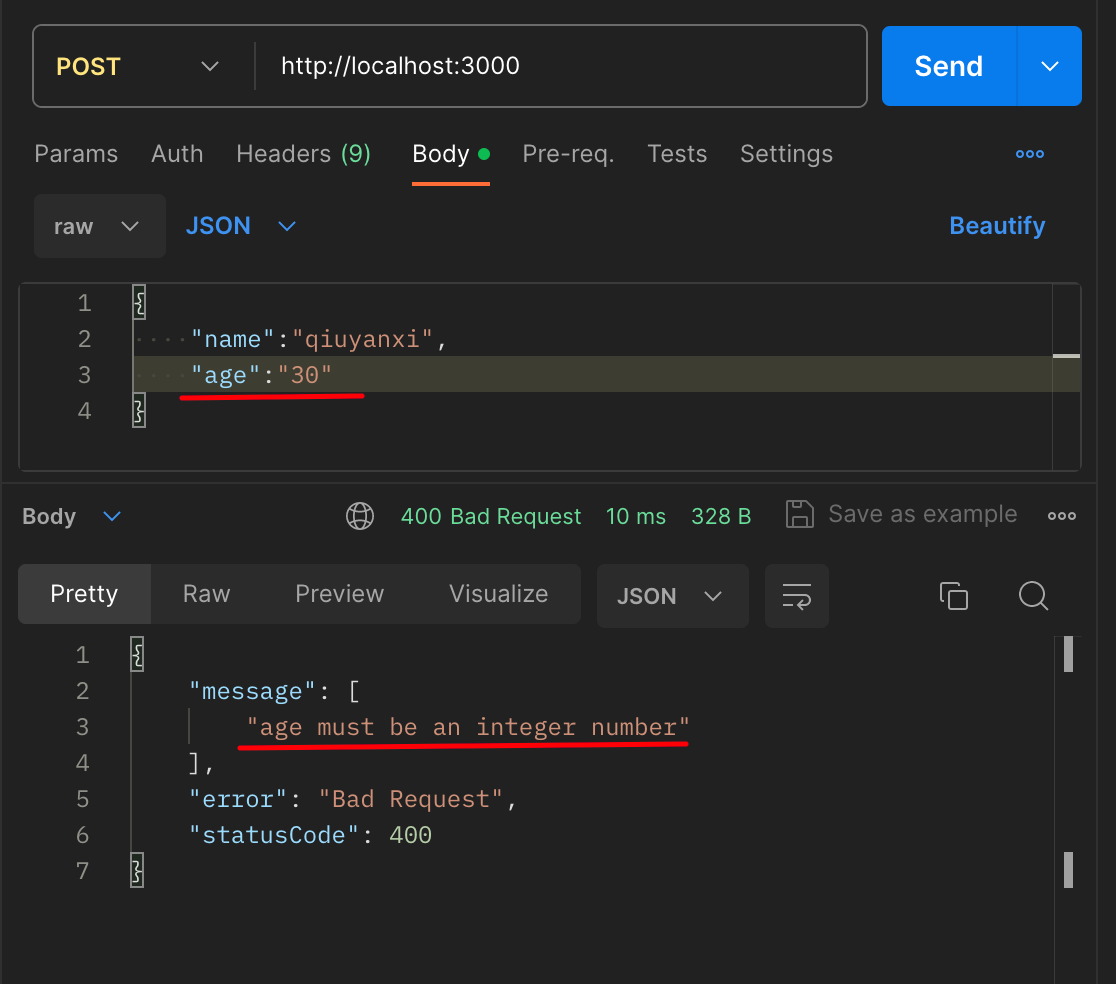
validationPipe 已经检查到参数里的错误了。
简单来说整个实现过程是这样的:
我们声明了参数的类型为 dto 类,pipe 里拿到这个类,把参数对象通过 class-transformer 转换为 dto 类的对象,之后再用 class-validator 包来对这个对象做验证。
我们其实也可以自己动手实现:
bash1nest generate pipe MyValidationPipe --no-spec
typescript1import { ArgumentMetadata, BadRequestException, Injectable, PipeTransform } from '@nestjs/common'
2import { plainToInstance } from 'class-transformer'
3import { validate } from 'class-validator'
4
5@Injectable()
6export class MyValidationPipePipe implements PipeTransform {
7  async transform(value: any, metadata: ArgumentMetadata) {
8    const object = plainToInstance(metadata.metatype, value)
9    const errors = await validate(object)
10    if (errors.length > 0) {
11      throw new BadRequestException('Validation failed')
12    }
13    return value
14  }
15}
metadata.metatype其实就是这个:
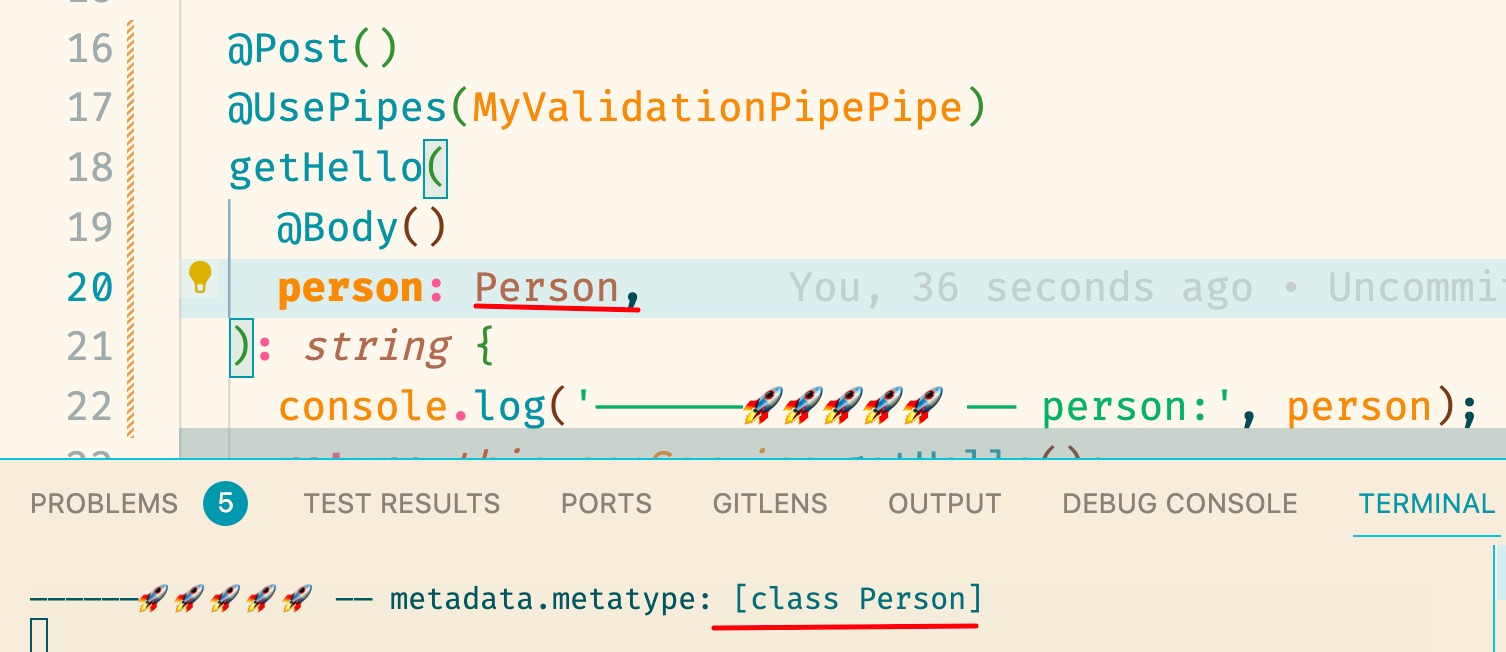
通过 class-transformer 的 plainToInstance方法将普通对象转换为 dto class 的实例对象。
之后调用 class-validator 包的 validate api 对它做验证。如果验证不通过,就抛一个异常。
再次请求一下:
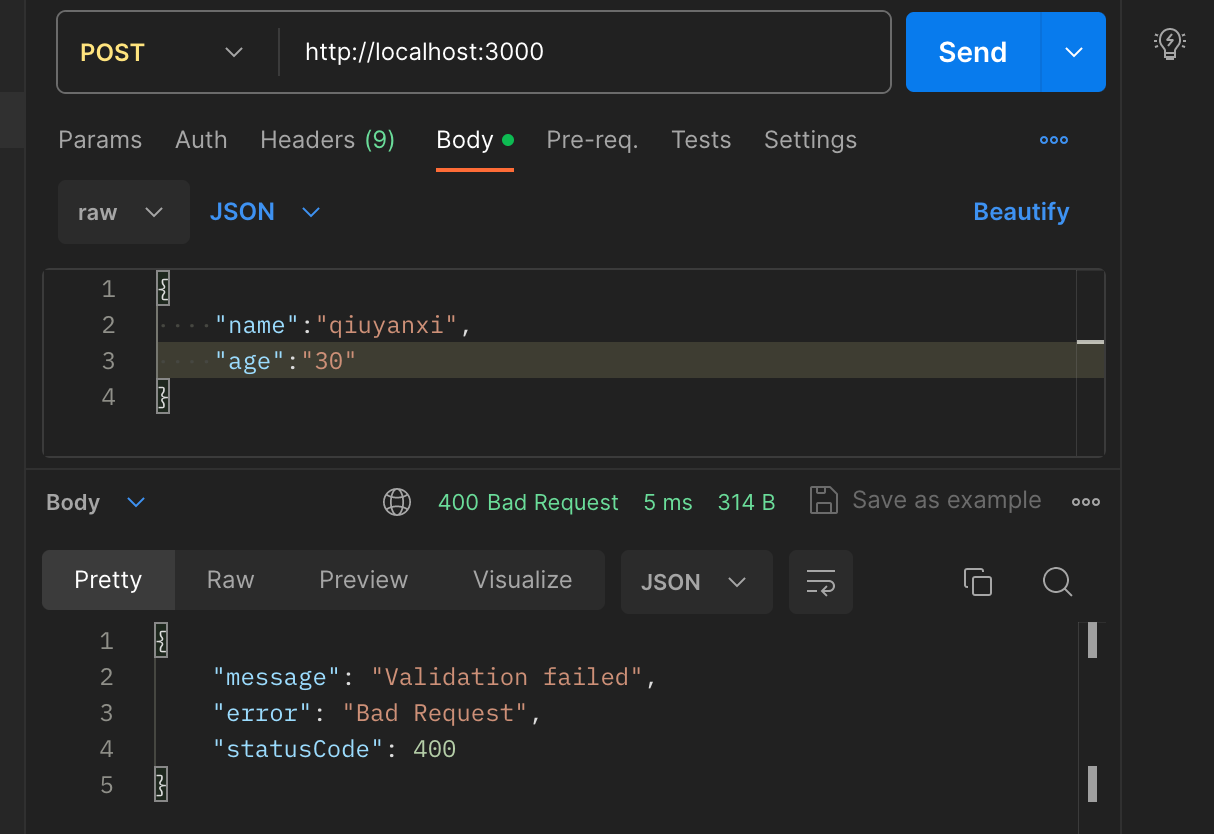
我们自己实现的 validationPipe 已经生效啦。
可注入依赖的全局 Pipe
跟 Interceptor 一样,Pipe 可以使用useGlobalPipes做全局的 Pipe 。
typescript1async function bootstrap() {
2  const app = await NestFactory.create(AppModule)
3  await app.useGlobalPipes(new MyValidationPipePipe())
4  await app.listen(3000)
5}
但这种方式无法在 pipe 内部注入依赖。
使用 nest 提供的APP_PIPE token 可以指定全局的 Pipe。
typescript1    {
2      provide: 'pipe_config',
3      useFactory() {
4        return { env: 'dev' };
5      },
6    },
7    {
8      provide: APP_PIPE,
9      useClass: MyValidationPipePipe,
10    },
用这种方式注册的全局 Pipe 能够注入依赖:
typescript1@Injectable()
2export class MyValidationPipePipe implements PipeTransform {
3  @Inject('pipe_config')
4  private readonly pipeConfig: any
5  async transform(value: any, metadata: ArgumentMetadata) {
6    console.log('——————🚀🚀🚀🚀🚀 —— pipeConfig:', this.pipeConfig)
7    const object = plainToInstance(metadata.metatype, value)
8    const errors = await validate(object)
9    if (errors.length > 0) {
10      throw new BadRequestException('Validation failed')
11    }
12    return value
13  }
14}
class-validator
class-validator 提供了很多供验证的装饰器。
例如:
typescript1import { Contains, IsInt, Length, IsEmail, IsFQDN, IsDate, Min, Max, IsOptional } from 'class-validator'
2
3export class Person {
4  @Length(3)
5  name: string
6  @IsInt()
7  @Min(0)
8  age: number
9  @IsOptional()
10  @Contains('hello')
11  text: string
12  @IsEmail()
13  email: string
14  @IsFQDN()
15  website: string
16  @IsDate()
17  birthday: Date
18  @Max(3)
19  height: number
20}
其中 @IsFQDN 是是否是域名的意思。@IsOptional 可以让该字段变得可选。
如果参数不正确,则会有报错信息:
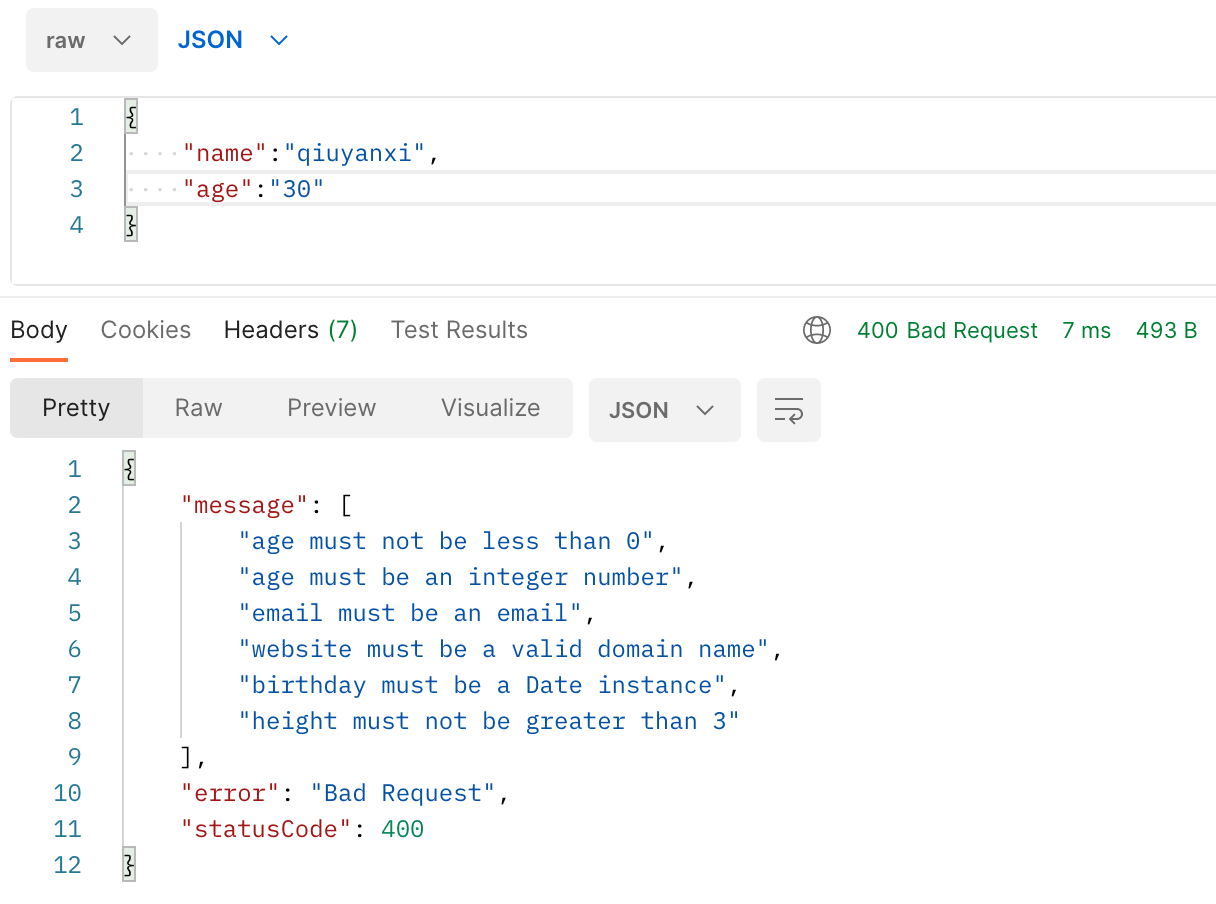
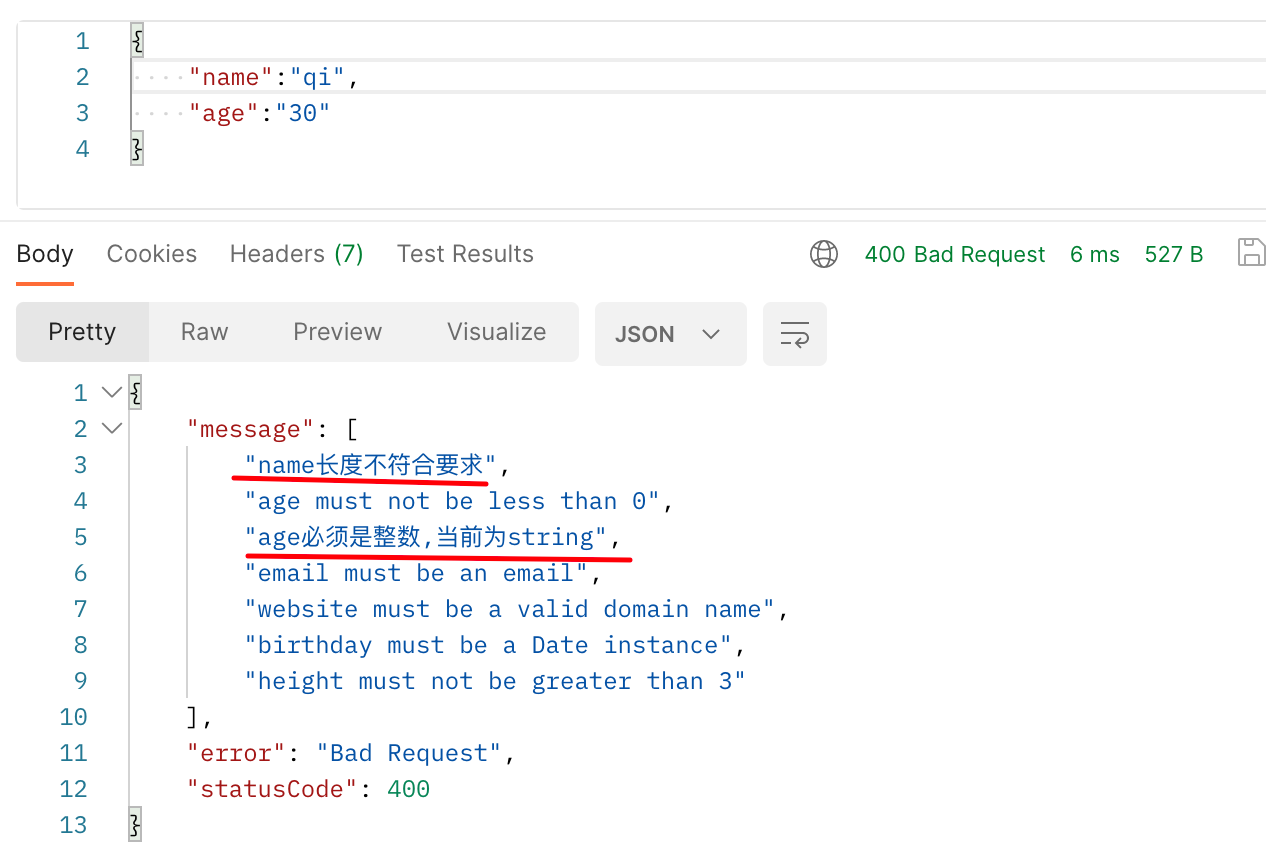
错误消息也是可以定制的:
typescript1  @Length(3, 10, {
2    message: 'name长度不符合要求',
3  })
4  name: string;
5  @IsInt({
6    message: (arg) => `age必须是整数,当前为${typeof arg.value}`,
7  })
总结
借助 Pipe,我们可以对参数做校验。
Nest 提供了很多内置的 Pipe,例如 ParseIntPipe、ParseUUIDPipe 等。
typescript1  @Get()
2  getHello(
3    @Query('id', ParseUUIDPipe) id: string,
4    @Query('age', ParseIntPipe) age: number,
5  )
用得最多的是 validationPipe,验证 Post 请求的参数非常方便。
它的实现原理是基于 class-tranformer 把参数对象转换为 dto class 的对象,然后通过 class-validator 基于装饰器对这个对象做验证。
如果是全局 pipe 想注入依赖,需要通过 APP_PIPE 的 token 在 AppModule 里声明 provider。